Generating Reports as Documents
Any of your available Report Templates can be generated in the following formats:
- Web Document (MHT)
-
Web Document (HTML, Loose files)
What's the difference between MHT and HTML, Loose Files? See About Web Documents (MHT or HTML, Loose Files).
-
Microsoft Word Document (DOC)
- Text Document (TXT)
- Comma Separated File (CSV)
- Portable Document Format (PDF)
To generate a report as a document, click the Reports tab at the top of the screen and select the Report Template you want to generate. Then click the Generate Report link or the  button located on the template. This launches the Generate Report wizard.
The Generate Report Wizard
The Generate Report Wizard has the following pages:
Storages Page
On the Storages page, check the Storage that contains the data you want to report on.
Note: Only Storages that contain the Schema your Report Template is based on are displayed here.
Format Page
On the Format page, select the format(s) for the report document (Web Document, Word, CSV, Text or PDF).
Note: there are two types of Web Documents; MHT and HTML Loose files. See About Web Documents (MHT or HTML, Loose Files) to understand the differences.
Publish Page
The Publish page has the following options:
Document Name:
The 'Document Name' text box defaults to the name of your Report Template, however you can rename it as desired each time you generate the report. This is useful if you are applying a filter (such as a Username filter) when you generate the report and would like to name the report appropriately.
Prefix with the current date:
You can prefix the current date to the report name each time it is generated. This is recommended if you are generating the same report on a regular schedule to avoid the previous report from being overwritten.
Display the report using the default viewer:
If this option is selected, once the report is created, it will automatically launch in the default viewer, such as Internet Explorer, Microsoft Word or Excel. Leave this option unchecked if you want the report to be created, but want to view it at a later stage.
Copy the report to a location:
All reports are saved into the folder defined in Tools | Options Paths. You can use this option to copy the report to an additional location such as an intranet site.
Compress the report using ZIP:
This option will compress the generated report and any associated files into one zip file. This is recommended if emailing a 'HTML, Loose Files' Report.
Make this report available for collation:
If you are generating the same report each day or week, you can collate those reports into one monthly or yearly report, avoiding the time and disk space associated with reporting on a month or year's worth of Storage data. See Collating Reports.
Documents Page
The Documents page enables you split your report into many report documents.
For example, instead of creating a single report document containing information about your entire organization, you can create a separate document/file for each Department. Or perhaps for each Category, or Productivity group.
To split your report into multiple documents:
- Check the Create separate report document for each checkbox
- Select the Summary and optional Alias to split the reports by
- To avoid thousands of Report Documents from being created, select the appropriate Having options, such as the Top 10 by Size.
Filters Page
When generating a report, you may like to specify a Filter such as a Date filter, or a Username (Field Value) filter. For more information see Filtering.
Email Page
The Email page of the Generate Report dialog enables you to send the report via email to any specified email address.
To send the report by email:
- Check the Send the report(s) by email checkbox
- Enter the email addresses you want the report to be emailed to in the 'To', 'Cc' and 'Bcc' edit boxes. You can enter multiple email addresses separated with a comma or semi colon.
- Enter the subject line for the email in the 'Subject' edit box. This defaults to the name of your Report Template.
- You will need to configure some options such as your SMTP server for the emailing functionality to work. Simply click the Email Options... button to do this (see Email Options)
About Web Documents (MHT or HTML, Loose Files?)
Web Documents are viewed in your Web Browser and include a sidebar making the report easy to navigate.
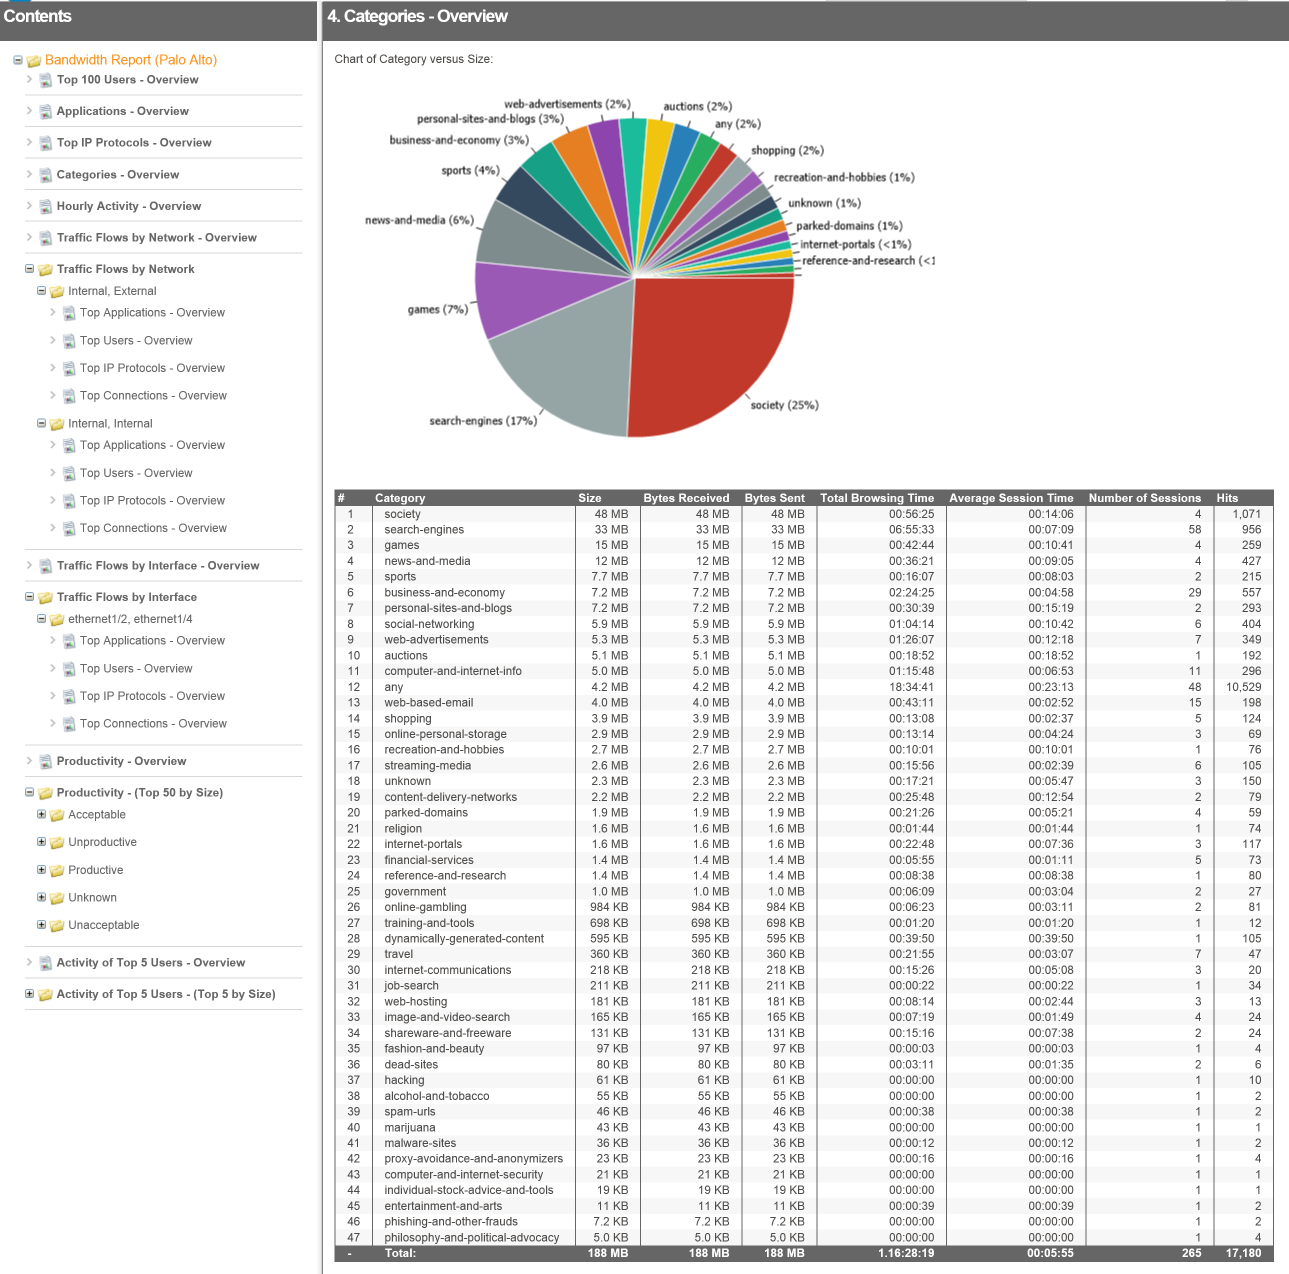 A Web Document report showing the navigation sidebar
There are two 'Web Document' formats; MHT and HTML, Loose files. Both formats create a report that can be viewed in a web browser. This table outlines the main differences between the MHT and HTML, Loose files formats:
| MHT | HTML, Loose files |
|---|---|
| Creates a single file with .mht extension. | Creates an index.html file plus a folder containing assets (images, styles, scripts etc). Note: The name of the index.html file is the name of the report. |
| Supported only in Internet Explorer. | Supported by all browsers. |
| IE struggles to open large MHT Files. | Large reports open fine. |
| Single file makes the report easier to send by email. | Need to use the 'zip' feature on the Publish page to zip all the files to send via email. The recipient then needs to extract the zip and open the .html file to view the report. |
Note: Instead of generating Web Document reports, you may like to Publish Reports to the Web Module. This enables people to view reports in their browser via a secure URL, removing the need to send them a physical document or file.